Football Fundamentals: I-Formation RB Counter Plays
This is a series post with lots of play diagrams. Where it lacks depth, it hopefully makes up for with breadth. The goal of this post is to demonstrate the many run game nuances that are at your disposal, outside the very basics that you can find almost anywhere. I will point out some key attributes for the plays, but for the most part the diagrams will stand alone outside a brief description. This post is limited (out of necessity) to strongside plays that are given directly to the RB. It does not include FB runs, or QB runs, or H-Back, Wing, TE, or WR runs. It also doesn't include option plays. Those are things for future posts.
Why did I select an I-formation, which is mostly going out of fashion, and how do I expect this information to be utilized? The I-Formation is a classic 2-back set that, by the time it was implemented, had the benefit of a lot of football history. It is also a highly adaptable run formation, along for offsets, for H-backs, and other aspects that allow essentially any run concept to be incorporated into its framework. And that's the important bit: you can look at an I-Formation run play and easily carry it forward to many modern formations. For instance, by altering footwork and possibly timing, any of these plays can be utilized in the following:
This post will focus on Counter Plays

Counter
Counter OF
The most utilized Counter play in today's game, Counter OF kicks the EMOL with the OG and leads to the playside LB with the FB.

Short Counter OF
Also known as an Influence Counter, the short Counter will act much like Lead Short Trap, with the difference being that the trap will always occur two DL away.


Counter OF Log
Counter OF action, but attempting to get outside the defense. As the defense starts to try to restrict the playside hole, log them inside and get to the edge.


Counter OT
The original counter play, it has seen resurgence of late, particularly in the read game. First puller kicks, second leads to playside LB.


Counter OT Log
Designed to get to the outside once the defense starts cheating inside, this is like Counter OF Log, where the kick block gets a bit more depth in order to log the EMOL inside.

Lead Counter OT
Requires an additional blocker to account for the backside (or a read), this play will typically try to bounce outside by logging the EMOL with the FB (or first puller if FB is aligned weak). While it can also be run like traditional Counter OT with an additional lead blocker, in order to do so, you have to make sure you have a good blocker on the backside of the play to prevent it from being chased down from behind.

Counter Dart
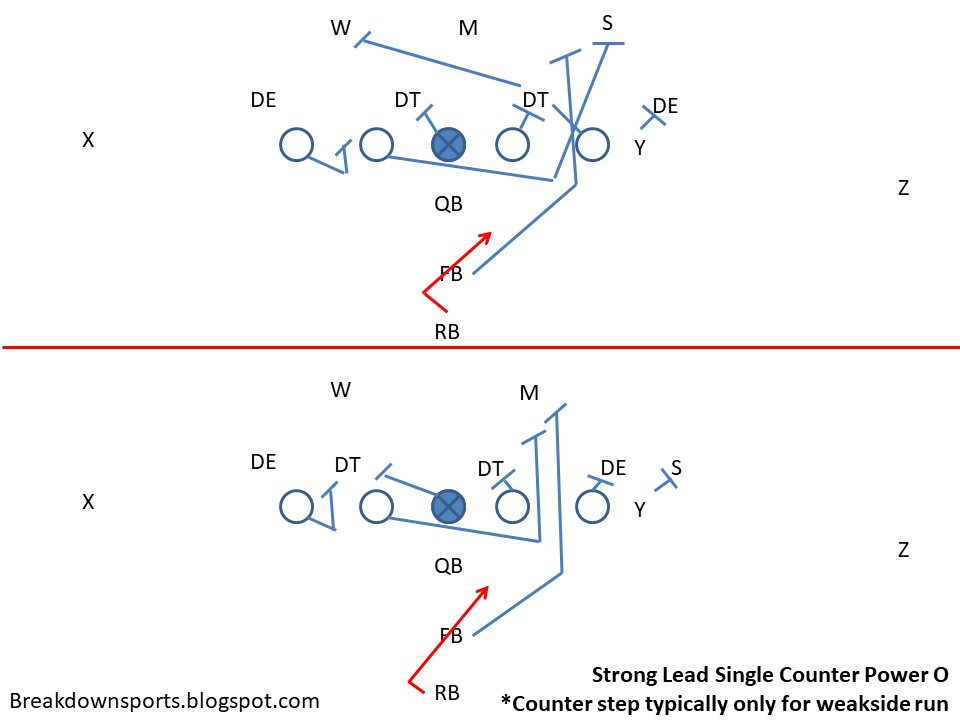
Power O but with a tackle pull. In order to allow for the extra ground that has to be made up from pulling the T instead of the OG, a counter step is appropriate.

Lead Single Dart
Just as you can add a lead blocker to Power O by running "Single Back Power O" and adding a FB as a lead blocker, Counter Dart can have the same theme.

Split Single Dart
This is typically a weakside run, with the backside TE replacing the FB's block. But as a strongside run, it allows you to get split flow in the backfield and a scissors path with the RB, to threaten weakside before hitting Power on the frontside.

Counter Wrap
Many people use "Wrap" and "Dart" interchangeably, but in this case, with "wrap", the RB receives the handoff on the backside, and follows the OT who pulls all the way around the formation and logs the defensive EMOL. The FB will take a similar path and lead outside.

Toss Counter
The ball is either tossed to the RB or is fake tossed before handing back to him. Either way, this utilizes a long trap, with the tackle pulling across the formation and kicking out the EMOL.


Kick Counter Fold
This counter initially will look like Weakside Power (or Dart) but is in fact a counter that works to the backside as the defense flows weak.


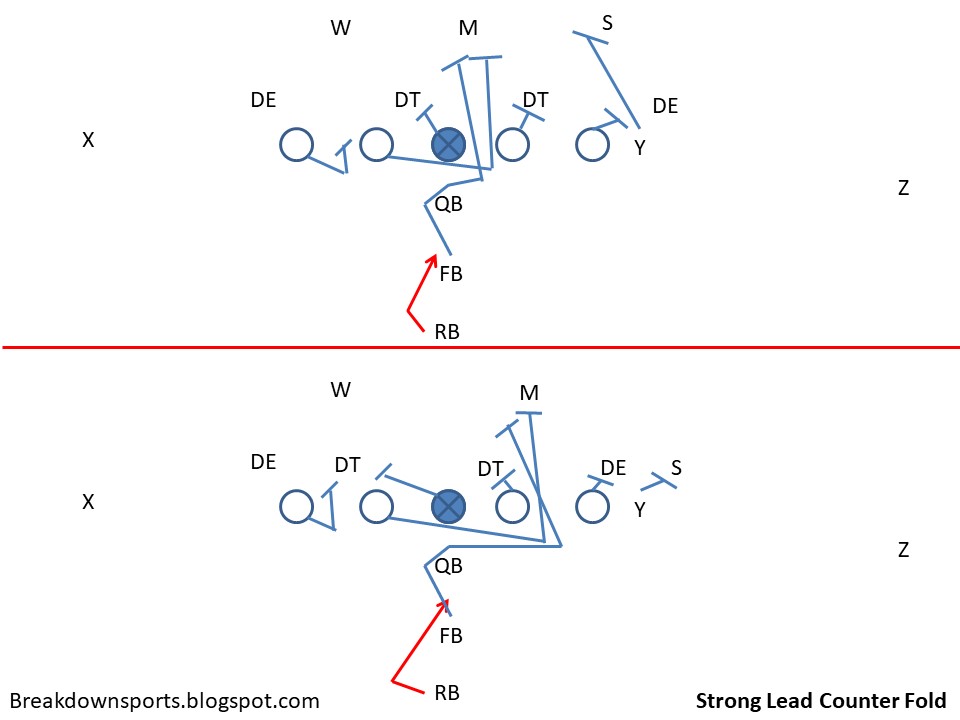
Lead Counter Fold
Lead Fold O but with Counter action in the backfield.

Split Counter O
Split Single Power O but with Counter footwork from the RB to help sell the split flow.

Bend
A Counter without a puller. This play sees the RB receive the ball on the weakside and "bend" playside after the snap. The FB starts playside.

Belly Counter
This is effectively an Iso play, but with counter action in the backfield. Both the FB and RB will start away from the play like a weakside Iso. Once the RB receives the ball, he will cut back playside.

Why did I select an I-formation, which is mostly going out of fashion, and how do I expect this information to be utilized? The I-Formation is a classic 2-back set that, by the time it was implemented, had the benefit of a lot of football history. It is also a highly adaptable run formation, along for offsets, for H-backs, and other aspects that allow essentially any run concept to be incorporated into its framework. And that's the important bit: you can look at an I-Formation run play and easily carry it forward to many modern formations. For instance, by altering footwork and possibly timing, any of these plays can be utilized in the following:
- 2-Back Shotgun Runs (with the second back potentially being a FB, an H-Back, a Wing, or a Sniffer)
- 1-Back Shotgun QB Runs (utilizing the RB as an added blocker)
- 1-Back Shotgun Read Options (the read of a run-run option, run-pass option, or pass-run option take the place of the additional blocker).
Many of the best current offenses often circle back to old formations. In the NFL, along with the modern spread concepts, you see a lot of the best offenses utilizing Wing T concepts. This set of plays does the same where it can (though, again, recognize that the option packages and fake packages are not included in this post, so it is somewhat limited). Below, you will see each play blocked against the two fundamental Even Fronts (4-3 Over and Under).
Isolation Plays
Gap and Pull Plays
Fold and Trap Plays
Counter Plays
Pull Replace Plays
Zone and Zone Counter Plays
Zone/Gap Combo Plays
Draw Plays
Gap and Pull Plays
Fold and Trap Plays
Counter Plays
Pull Replace Plays
Zone and Zone Counter Plays
Zone/Gap Combo Plays
Draw Plays
This post will focus on Counter Plays

Counter
Counter OF
The most utilized Counter play in today's game, Counter OF kicks the EMOL with the OG and leads to the playside LB with the FB.
Short Counter OF
Also known as an Influence Counter, the short Counter will act much like Lead Short Trap, with the difference being that the trap will always occur two DL away.

Bluff Counter OF
Bluff counter can be a good design if the defense starts inserting a strongside safety. The Y-TE will cross the face of the EMOL, widening him in the process, before he moves onto the playside fill defender.
Note, against the Under front, teams may block this differently. As designed, the playside SAM is only walled off by the inside kick block. Because of this, some teams may send the playside Tackle to the MIKE and have the FB take first unblocked he sees, which will allow him first to take DE/SAM if they present in the hole, otherwise turn up and look for the WILL. Others may try to kick the SAM with the playside Tackle and kickout the DE with the trap pull.

Counter OF Log
Counter OF action, but attempting to get outside the defense. As the defense starts to try to restrict the playside hole, log them inside and get to the edge.

Lead Single Counter Power O
Counter footwork on a power play is typically utilized primarily for weakside runs, but theoretically can be used to the strongside as well. This is the same as the Lead Single Power O, only with Counter footwork.
The original counter play, it has seen resurgence of late, particularly in the read game. First puller kicks, second leads to playside LB.

Short Counter OT
Similar to Short Counter OF, but with two pulling OL. The short version will tend to play a little tighter, so make sure your FB has a good angle to cutoff the backside. In this case, it is difficult to be so tight as to trap a 3T, so the trapped defender is the first DL from 4i-Tech-Out.

Designed to get to the outside once the defense starts cheating inside, this is like Counter OF Log, where the kick block gets a bit more depth in order to log the EMOL inside.

Lead Counter OT
Requires an additional blocker to account for the backside (or a read), this play will typically try to bounce outside by logging the EMOL with the FB (or first puller if FB is aligned weak). While it can also be run like traditional Counter OT with an additional lead blocker, in order to do so, you have to make sure you have a good blocker on the backside of the play to prevent it from being chased down from behind.

Power O but with a tackle pull. In order to allow for the extra ground that has to be made up from pulling the T instead of the OG, a counter step is appropriate.

Lead Single Dart
Just as you can add a lead blocker to Power O by running "Single Back Power O" and adding a FB as a lead blocker, Counter Dart can have the same theme.

Split Single Dart
This is typically a weakside run, with the backside TE replacing the FB's block. But as a strongside run, it allows you to get split flow in the backfield and a scissors path with the RB, to threaten weakside before hitting Power on the frontside.

Counter Wrap
Many people use "Wrap" and "Dart" interchangeably, but in this case, with "wrap", the RB receives the handoff on the backside, and follows the OT who pulls all the way around the formation and logs the defensive EMOL. The FB will take a similar path and lead outside.

Toss Counter
The ball is either tossed to the RB or is fake tossed before handing back to him. Either way, this utilizes a long trap, with the tackle pulling across the formation and kicking out the EMOL.

Counter Crack G Lead
G Lead typically gets outside quickly, in this case, it utilizes counter footwork and a toss to get outside the formation. This can help seal the defense inside.
Kick Counter Fold
This counter initially will look like Weakside Power (or Dart) but is in fact a counter that works to the backside as the defense flows weak.

BOB Counter Fold
Initially sells weakside Iso with the FB action, before working back playside. Can scissor RB to help sell Iso (hand off weakside and have RB wrap after the mesh)

Lead Fold O but with Counter action in the backfield.
Split Counter O
Split Single Power O but with Counter footwork from the RB to help sell the split flow.

Bend
A Counter without a puller. This play sees the RB receive the ball on the weakside and "bend" playside after the snap. The FB starts playside.

Belly Counter
This is effectively an Iso play, but with counter action in the backfield. Both the FB and RB will start away from the play like a weakside Iso. Once the RB receives the ball, he will cut back playside.

* Note, all nomenclature is my own, though attempts to be fairly consistent with standard. As plays get added, you can add "tags" to base plays (as I have done) or create single word names to take the place for shorter communication.

Comments
Post a Comment