Football Fundamentals: I-Formation RB Zone/Gap Combo Plays
This is a series post with lots of play diagrams. Where it lacks depth, it hopefully makes up for with breadth. The goal of this post is to demonstrate the many run game nuances that are at your disposal, outside the very basics that you can find almost anywhere. I will point out some key attributes for the plays, but for the most part the diagrams will stand alone outside a brief description. This post is limited (out of necessity) to strongside plays that are given directly to the RB. It does not include FB runs, or QB runs, or H-Back, Wing, TE, or WR runs. It also doesn't include option plays. Those are things for future posts.
Why did I select an I-formation, which is mostly going out of fashion, and how do I expect this information to be utilized? The I-Formation is a classic 2-back set that, by the time it was implemented, had the benefit of a lot of football history. It is also a highly adaptable run formation, along for offsets, for H-backs, and other aspects that allow essentially any run concept to be incorporated into its framework. And that's the important bit: you can look at an I-Formation run play and easily carry it forward to many modern formations. For instance, by altering footwork and possibly timing, any of these plays can be utilized in the following:
In this post we will look at plays that combine zone concepts and man/gap concepts.
Zone/Gap Combination Plays
Backside Pin and Fold
Pin and fold incorporates a combination of inside zone and a fold scheme. Here, we are looking at a backside fold combined with a front side inside zone. The pin and fold on the backside naturally creates a cutback lane for the inside zone.

Middle Pin and Fold
This will move the fold to the front side, and allows for the front side to be a bit more of an isolation play. That said, the backside is still inside zone, and so the read can be made similar, along with the natural cutback that occurs with inside zone.

Frontside Pin and Fold - Kick
All the previously plays utilized split zone, now we are going to utilize a kick block. This allows the TE the arc the the SS if he is spinning down as an extra run defender. This gives a zone look, but really stresses the front side run.


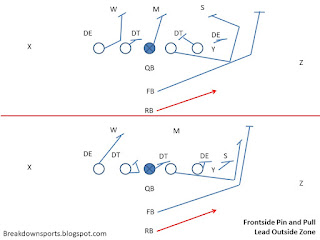
Frontside Pin and Pull
The well known outside zone variant, pin and pull here is limited to the front side of the formation. Notice in standard pin and pull, the TE is going to try to reach the EMOL if possible.

Full Pin and Pull
It's difficult for the backside of the formation to get frontside on pin and pull, but it isn't impossible. Utilizing a full pin and pull limits the backside cut off blocks at the second level but adds another puller at the point of attack.


Why did I select an I-formation, which is mostly going out of fashion, and how do I expect this information to be utilized? The I-Formation is a classic 2-back set that, by the time it was implemented, had the benefit of a lot of football history. It is also a highly adaptable run formation, along for offsets, for H-backs, and other aspects that allow essentially any run concept to be incorporated into its framework. And that's the important bit: you can look at an I-Formation run play and easily carry it forward to many modern formations. For instance, by altering footwork and possibly timing, any of these plays can be utilized in the following:
- 2-Back Shotgun Runs (with the second back potentially being a FB, an H-Back, a Wing, or a Sniffer)
- 1-Back Shotgun QB Runs (utilizing the RB as an added blocker)
- 1-Back Shotgun Read Options (the read of a run-run option, run-pass option, or pass-run option take the place of the additional blocker).
Many of the best current offenses often circle back to old formations. In the NFL, along with the modern spread concepts, you see a lot of the best offenses utilizing Wing T concepts. This set of plays does the same where it can (though, again, recognize that the option packages and fake packages are not included in this post, so it is somewhat limited). Below, you will see each play blocked against the two fundamental Even Fronts (4-3 Over and Under).
Isolation Plays
Gap and Pull Plays
Fold and Trap Plays
Counter Plays
Pull Replace Plays
Zone and Zone Counter Plays
Zone/Gap Combo Plays
Draw Plays
Gap and Pull Plays
Fold and Trap Plays
Counter Plays
Pull Replace Plays
Zone and Zone Counter Plays
Zone/Gap Combo Plays
Draw Plays
In this post we will look at plays that combine zone concepts and man/gap concepts.

Zone/Gap Combination Plays
Backside Pin and Fold
Pin and fold incorporates a combination of inside zone and a fold scheme. Here, we are looking at a backside fold combined with a front side inside zone. The pin and fold on the backside naturally creates a cutback lane for the inside zone.

Middle Pin and Fold
This will move the fold to the front side, and allows for the front side to be a bit more of an isolation play. That said, the backside is still inside zone, and so the read can be made similar, along with the natural cutback that occurs with inside zone.

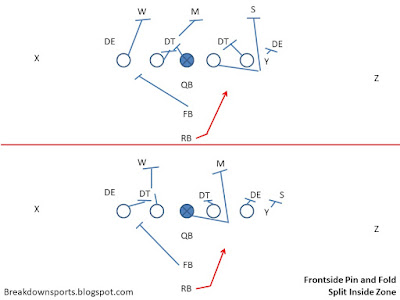
Frontside Pin and Fold
Now the fold moves all the way to the frontside of the formation. With this, you will tend to see the play bounce. This is good against teams that see inside zone and tend to fill down with the MIKE and WILL, as it naturally gets them sealed to the backside of the play while having an isolation block on the front side.
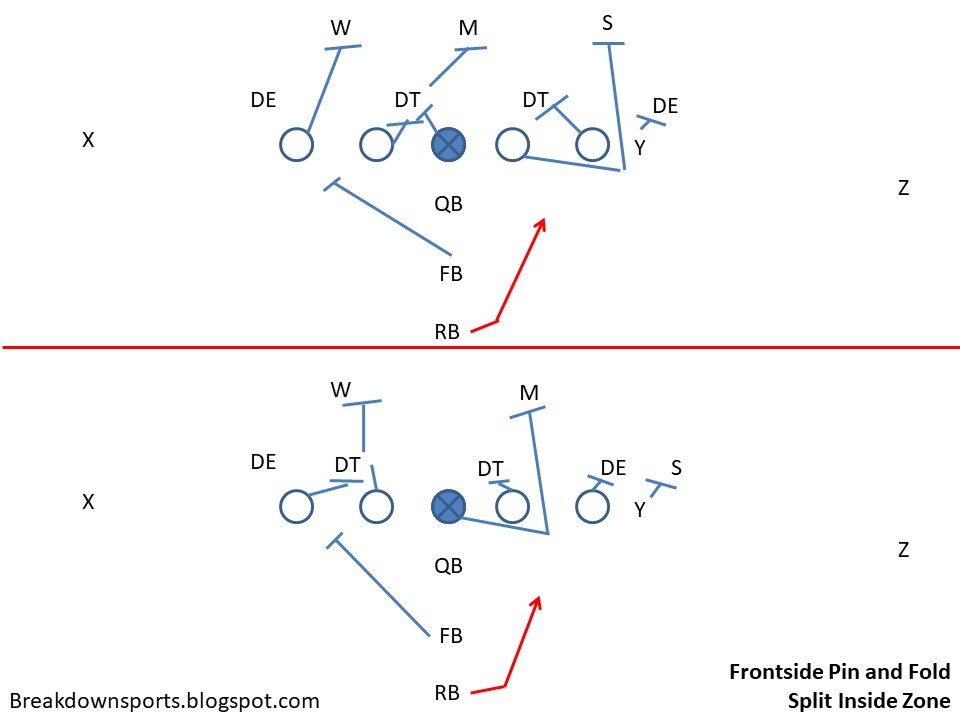
All the previously plays utilized split zone, now we are going to utilize a kick block. This allows the TE the arc the the SS if he is spinning down as an extra run defender. This gives a zone look, but really stresses the front side run.

Full Pin and Fold
We are now folding wherever we don't have a defender in the backside gap. This trades doubles at the point of attack for folds.

The well known outside zone variant, pin and pull here is limited to the front side of the formation. Notice in standard pin and pull, the TE is going to try to reach the EMOL if possible.

Full Pin and Pull
It's difficult for the backside of the formation to get frontside on pin and pull, but it isn't impossible. Utilizing a full pin and pull limits the backside cut off blocks at the second level but adds another puller at the point of attack.

Stretch G
A G scheme, but in this case everyone else is running outside zone. Here, the pulling OG is not attempting to get outside the formation, instead, this is only a frontside pull in the event of a defender aligned in the playside gap of the OG. This little wrinkle can help reach the SAM.

Kick Stretch G
Rather than having the FB lead to the safety, this gets the TE out to the safety. The outside release of the TE will help widen the EMOL for the FB to kick, widening the gap that the Stretch G is attempting to attack.

Down G
The zone version of Down G. This always sees the guard down block the end man on the LOS, while the rest of the frontside down blocks and the rest of the backside runs stretch.

TEX Zone
A quick hitting TEX zone sees the TE down block into a gap and the OT pass set and kick the EMOL. This helps quickly seal the edge and shove the defense inside, forming a natural crease playside.

Y-Crack Zone
With and Off-Y, the Y will initially sell stretch before cracking back underneath the OT to the second level LB. The FB is responsible for the first DL inside the EMOL, either as a kickout or a double with another OL. A great way to force the bang/bend read really far back inside even with an otherwise stretch look.

Frontside Pin Down
Down G/T, this down scheme will pull and kick with the first OL that doesn't have an DL in their inside gap. This helps limit issues associated with a 2 tech following the G on his kick.
Middle Pin Down
This allows you to run a down scheme with the better puller between the PSG and the C.

Split Down G
Split, or wham blocking to the backside of Down G is a nice way to provide split flow backfield and holding the backside of the defense. This also allows the OL to get immediately out to the second level to help seal the backside.

Frontside Pin Down and Pull
From the center and back, the OL is going to run a stretch scheme. This allows the guard to always pull, and if the PST also doesn't have a defender in the gap behind him he can pull as well. First puller kick, second puller moves the second level.

Middle Pin Down and Pull
Similar concept but now the pullers are between the guards. First puller kicks, second puller leads to second level.

Comments
Post a Comment