Posts

Showing posts with the label Paul Chryst

Inside the Playbook: Wisconsin Play Action Power O Wheel
Image
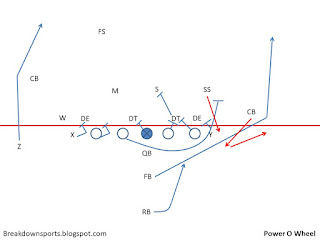
Against Iowa, Wisconsin was finally able to get things going offensively when they returned to an old friend in the offense: the wheel route off of Power O. I knew I had seen it previously, and mistakenly noted it was a few years ago in a bowl game, but actually it was against Indiana last year. The basics of the play are a hard Power O play action out of a heavy formation. Rather than kicking out, the FB plants and runs upfield on the wheel route. What ensues is beautiful, beautiful FBs rumbling in wide open spaces. Let's take a look.

Inside the Playbook: Wisconsin's Inside Double Post

Image
Double Post is one of the go-to concepts in modern football. Like slants, for the QB, this concept provides a relatively clear and concise movement key: the concept side safety. Concept side safety works over top of the first post, you throw the second post. Concept side safety stays home, throw the first post. It's more popular cousin - Mills - made famous by Steve Spurrier, is similar in many ways, but double post keeps the attack vertical. Wisconsin took the double post concept and merged it with an All Verts or Seattle concept, and moved the double post inside. While All Verts can end up looking very similar, knowing that you have double posts can simplify life for your QB. It can also allow you to modify the timing of other routes to work within the double post scheme. In this post, we will look a little closer at how Wisconsin utilized this concept and why.

Inside the Playbook: Wisconsin's Flood Play

Image
The last rollout play we are going to look at from Wisconsin (for now) is a basic sail concept. I’ve previously discussed how they’ve utilized swap boot ( in two parts ), in which TEs are primary attacking the flat and underneath off of delayed routes. With the sail route, they now have an opportunity to work vertical to threaten the deep outside of the field.

Inside the Playbook: Wisconsin Swap Boot Part II

Image
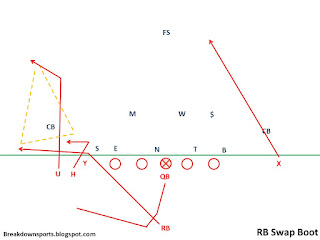
Previously, we touched on Wisconsin’s use of the Swap Boot in their 2-TE personnel package. In this post, we are going to look at the same concept, but instead of utilizing a TE in the flat, the RB is going to be incorporated into the pass concept. What we’ll see is a way of utilizing receiver’s in different spots on the field while keeping the reads and timing consistent for the QB.

Inside the Playbook: Iowa's Outside Zone Gap Counter

Image
Iowa has long been known for its use of the stretch zone run scheme , and they love to use a FB within this scheme for a variety of reasons. In fact, one of their favorite runs is the lead outside zone play . Because it is such a staple of the offense, opponents have stressed the importance of defending this play whenever they face Iowa, to the point that Iowa has established a number of "counters" to take advantage of those defensive strategies. The most common strategy that Iowa utilizes is a pin and pull scheme, but they also incorporate other variations. In this post, we will look briefly at how defenses defend Iowa's stretch scheme, and how Iowa deployed a "gap counter" to effectively counter those strategies.

Inside the Playbook: Wisconsin Swap Boot Scheme

Image
I’ve previously discussed how Wisconsin utilizes Dos, TightBunch, and Wings in formation to run a lot of Power O , Lead, and Counter plays . Similarly, they utilize the width of the formation to successfully run a lot of zone schemes, including both Inside Zone and Outside Zone. In this post, we will look at the swap boot concept, and then in the next post, we will look at similar concepts with small tweaks to the setup.

Inside the Playbook: Wisconsin Lead Power O, Power O, and Counter with F/H Part II

Image
In this post, we'll continue to look at how Wisconsin utilizes the Wing to run Power O. Wisconsin will utilize 12 personnel most often, but will also sprinkle in 11 personnel or even 13 personnel to run this play. And while they can still run a traditional, I-Form Power O, I want to focus specifically on what they do with a TE off the LOS, and how they utilize that as well as anyone in college football to add a blocker from the backside, and insert him at the point of attack. Part 1 can be found here

Inside the Playbook: Wisconsin Lead Power O, Power O, and Counter with F/H Part I

Image
In this post, we are going to look at how Wisconsin utilizes the Wing to run Power O. Wisconsin will utilize 12 personnel most often, but will also sprinkle in 11 personnel or even 13 personnel to run this play. And while they can still run a traditional, I-Form Power O, I want to focus specifically on what they do with a TE off the LOS, and how they utilize that as well as anyone in college football to add a blocker from the backside, and insert him at the point of attack.

Inside the Playbook: Wisconsin's use of Dos, Tight Bunch, and Wings in Formation

Image
As we cover Wisconsin over the next few pieces, we are predominately going to focus on three formations: Dos (Tight Double Wing), Tight Bunch, and I-Form. Wisconsin finds ways to use FBs and H-Backs within the offense, to lead block, to run rubs, or to even to cross flow. In this post we will first cover the high level benefits of these formations for Wisconsin. In the next posts, we will go into depth into specific plays, predominately run out of these formations.