Football Fundamentals: I-Formation RB Zone and Zone Counter Plays
This is a series post with lots of play diagrams. Where it lacks depth, it hopefully makes up for with breadth. The goal of this post is to demonstrate the many run game nuances that are at your disposal, outside the very basics that you can find almost anywhere. I will point out some key attributes for the plays, but for the most part the diagrams will stand alone outside a brief description. This post is limited (out of necessity) to strongside plays that are given directly to the RB. It does not include FB runs, or QB runs, or H-Back, Wing, TE, or WR runs. It also doesn't include option plays. Those are things for future posts.
Why did I select an I-formation, which is mostly going out of fashion, and how do I expect this information to be utilized? The I-Formation is a classic 2-back set that, by the time it was implemented, had the benefit of a lot of football history. It is also a highly adaptable run formation, along for offsets, for H-backs, and other aspects that allow essentially any run concept to be incorporated into its framework. And that's the important bit: you can look at an I-Formation run play and easily carry it forward to many modern formations. For instance, by altering footwork and possibly timing, any of these plays can be utilized in the following:
In this post we will look at zone run plays

Zone Runs
The primary thing when it comes to running zone schemes is the six types of zone run and the tags you can add to the up-back to modify the strength/flow of the zone. This post will show examples of those, but not all examples, for some semblance of brevity.
Belly Zone
A cutback zone run play, many teams out of pistol and shotgun will actually run it to the backside of the play because you can't stay tight enough as you can from under center. Here we're seeing a split flow from the FB.


Wham Split Inside Zone
Against an Over front, this really gets a mass of bodies to the second level with angles to shove the LBs down the line and really hit the play vertical. Against and Under front, you must note the alignment of the WILL relative to the DT. When stacked, he will be difficult to cut off while still whamming the backside 3T, so rather than try that push the Y-TE up to the MIKE and double the DT to the WILL. This may force the play all the way backside almost like a Counter play.


Why did I select an I-formation, which is mostly going out of fashion, and how do I expect this information to be utilized? The I-Formation is a classic 2-back set that, by the time it was implemented, had the benefit of a lot of football history. It is also a highly adaptable run formation, along for offsets, for H-backs, and other aspects that allow essentially any run concept to be incorporated into its framework. And that's the important bit: you can look at an I-Formation run play and easily carry it forward to many modern formations. For instance, by altering footwork and possibly timing, any of these plays can be utilized in the following:
- 2-Back Shotgun Runs (with the second back potentially being a FB, an H-Back, a Wing, or a Sniffer)
- 1-Back Shotgun QB Runs (utilizing the RB as an added blocker)
- 1-Back Shotgun Read Options (the read of a run-run option, run-pass option, or pass-run option take the place of the additional blocker).
Many of the best current offenses often circle back to old formations. In the NFL, along with the modern spread concepts, you see a lot of the best offenses utilizing Wing T concepts. This set of plays does the same where it can (though, again, recognize that the option packages and fake packages are not included in this post, so it is somewhat limited). Below, you will see each play blocked against the two fundamental Even Fronts (4-3 Over and Under).
Isolation Plays
Gap and Pull Plays
Fold and Trap Plays
Counter Plays
Pull Replace Plays
Zone and Zone Counter Plays
Zone/Gap Combo Plays
Draw Plays
Gap and Pull Plays
Fold and Trap Plays
Counter Plays
Pull Replace Plays
Zone and Zone Counter Plays
Zone/Gap Combo Plays
Draw Plays
In this post we will look at zone run plays

Zone Runs
The primary thing when it comes to running zone schemes is the six types of zone run and the tags you can add to the up-back to modify the strength/flow of the zone. This post will show examples of those, but not all examples, for some semblance of brevity.
Belly Zone
A cutback zone run play, many teams out of pistol and shotgun will actually run it to the backside of the play because you can't stay tight enough as you can from under center. Here we're seeing a split flow from the FB.

Tight Zone
An A-Gap zone run play, here with split flow from the FB.

Inside Zone
Many teams will combine Tight Zone and Inside Zone and adjust depending on the bubble in the defensive front. This is a B-gap aiming point.

Middle Zone
Not many teams run Middle Zone with the C gap aiming point, but there are certain strengths to it, as I've described in the "six types of zone" article.

Outside Zone
The stretch play, will almost never actually get all the way outside unless the defense busts.

Wide Zone
If you need to get outside the formation, tell it to the blockers with a separate playcall. It tells them how they need to block if they want to execute the play successfully.

BOB Inside Zone
Now your FB aims for the backside LB in the zone scheme. This puts a Big-On-Big along the front, prevents the backside DE from squeezing the backside, and forces the Will to decide whether to play downhill or flow across, or get blocked up and end up playing neither.

BOB Outside Zone
This is typically a call when the FB is aligned weak presnap. The FB will take a zone path starting from the backfield almost parallel to the RB until he finds an insert to work through and up to the second level, cutting off backside pursuit. A nice changeup, particularly for teams that run a lot of lead outside zone.

MIKE Inside Zone
If they have a MIKE that just won't get blocked, ensure he does by having the FB ID him and get him blocked.

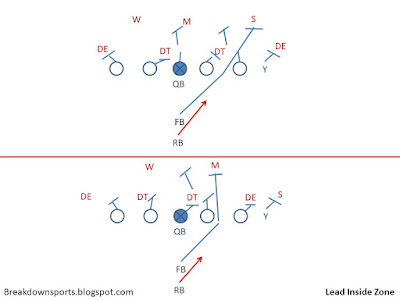
Lead Inside Zone
Add an additional gap playside by adding a lead blocker to the playside LB.

BOSS Wide Zone
If teams are spinning down a safety and getting him involved in the run defense, account for him with a blocker. This prevents teams from relying on Sky leverage to hold everything inside.

Kick Inside Zone
"Kick" or "Belly" or "Power", block the defensive EMOL with the lead blocker and allow the TE or frontside to get to the second level or double a 5-Tech. Really adds a different feel for a defender used to zone blocking to or away.

Crease Outside Zone
To improve your chances of hitting the edge and gaining movement on the playside EMOL, the FB will work with the TE to double the EMOL to the playside safety. This will form a natural crease on the edge for the RB to hit.

Midline Inside Zone
Block a frontside DL with your FB and zone off of that. Interior DL struggle to handle blocks from backs they aren't expecting (especially on plays directly at them). You don't need to run option to run midline.

Wham Inside Zone
Block the backside DL and allow your OL to flow immediately to LBs. Very effective wham/zone combination.

Wham Lead Inside Zone
Moving the TE to a Y-Off position, now you run split zone with the Y and add a lead blocker with the FB. This moves all the doubles back a defender, improving some of the playside angles.

Wham Kick Inside Zone
Similar to the above (identical against the Under front), the FB is now essentially swapping responsibilities with the TE in a standard split zone play. This allows the playside OT to get out to the SAM quicker, just be careful the EMOL isn't able to chase right down the back of the split flow TE, or he can cause some havoc. Nevertheless, like Power, you get a playside double plus a kick block.

Wham Lead Inside Zone
Give the look of split flow and hit them with wham.

Wham Kick Inside Zone
Swapping the responsibilities of the FB and TE. This can generally be effective if you play a lot of Off-Y and utilize the TE for split blocks.

Against an Over front, this really gets a mass of bodies to the second level with angles to shove the LBs down the line and really hit the play vertical. Against and Under front, you must note the alignment of the WILL relative to the DT. When stacked, he will be difficult to cut off while still whamming the backside 3T, so rather than try that push the Y-TE up to the MIKE and double the DT to the WILL. This may force the play all the way backside almost like a Counter play.

Zone Counter
Gap Counter
With Gap Counter, at the snap it looks like split zone, the RB will counter step, and preferably, the FB will log the EMOL.

Gap Bend Counter
Similar to gap counter above, but both RB and FB will sell playside paths at the snap before bending back to the backside.

Gap Bend Lead Counter
Again, both RB and FB start off on the OZ path before bending back to the backside. Now, though, the TE is locked on the defensive EMOL and the FB will be responsible for the man inside of him. Could potentially double lock on the backside and always have FB work to second level as well.

Gap Counter Pitch
Here you're going to sell lead Outside Zone, with counter footwork in the backfield. The pitch is to allow the RB to gain lateral spacing from the unblocked EMOL on the backside of the zone look.

Gap O Counter
On this play, each OL is going to block down on their gap initially, but after a full step one direction, the opposite guard will pivot-pull back and log in the EMOL. In this case, the Center must be aware that if the OG is covered, he needs to zone step to his man and overtake (or you can otherwise pull the C).


Comments
Post a Comment