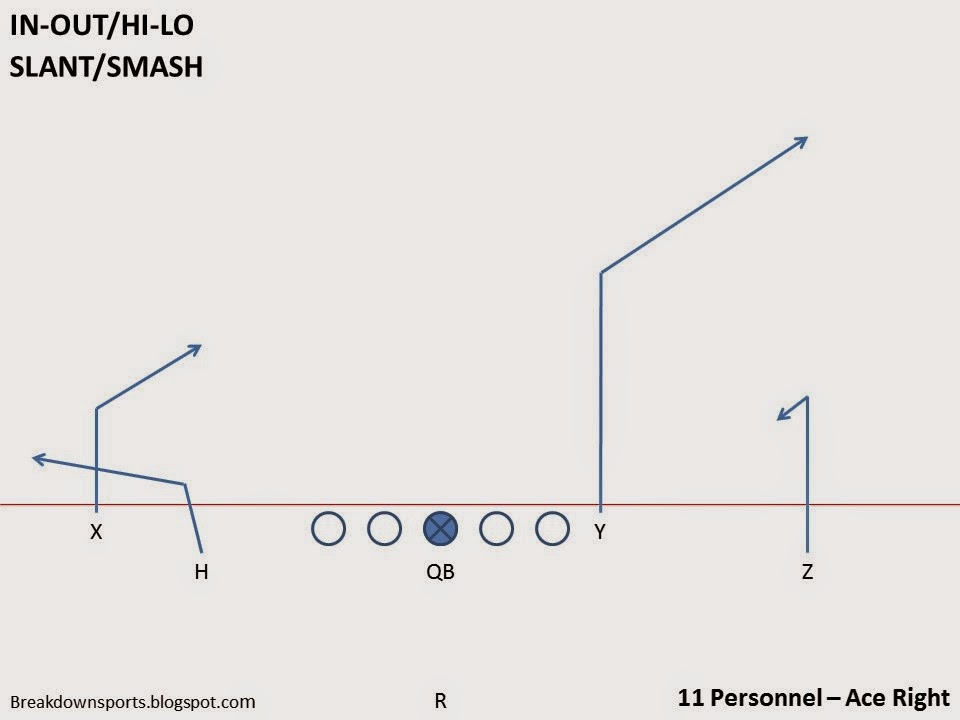
Let's Speak Technique - Blocking the Draw Play
The Draw play is one of the most effective run plays in any playbook. It's versatile. It works just as well on 1st and 10 as it does on 3rd and long. It presents a false read to the defense which sows seeds of doubt for the remainder of the game by looking initially like a pass play and then firing out and knocking some guys around. But it also allows an offensive line to get by without tons of movement. Sure, it's great when a DL gets into a pass rush and then you shotput him out of existence, but just as often you only need to utilize good footwork to position yourself between the ball carrier and the defender. In this post, I'm going to discuss the techniques employed on draw plays in a little more detail.

Point of Attack
The area where the block differs most from scheme to scheme is at the point of attack. Here, you cannot allow the defense to dictate terms because if they do, they blow up the whole play in the backfield. Depending on personnel and skill set, your options may differ.
Static Read Block

The is a zone combination block where two OL present a high hat but don't gain significant ground (i.e. they are static). First and foremost, they must both stay square to the LOS and must stay tight together so as not to be split. If you are covered, you are not going to gain ground laterally, but instead focus on taking your half of the defender. If you are the uncovered blocker, you will inside set to close the gap between yourself and your combo partner. You must have patience and allow the defender to go where he wants to go, do not get over aggressive and off balance, otherwise you risk getting split or not getting sufficient leverage; maintain your ground at the LOS. They do this in order to invite the pass rusher to go where he wants, but maintain strength in their firm, square base, and keep shoulder to shoulder so the defender can't split the combo. If the DL attacks outside the combo, the attack side blocker will leverage the defender out of the gap. As the other OL releases to the LB, he will flipper or push the defender so as to ensure his combo partner will maintain leverage upon release (again, you can't get split).
Drive

This is typically done to try to root out the A gap defender immediately. If your OL has difficult shifting from a pass set to a run block, just go out and run block to make sure you get movement at the point of attack and not allow the interior defenders to get penetration.
Short Set - Drive

A short set is going to be at maximum a one step drop to present a high hat and get the interior defender treating it like a pass rush scenario. Upon completion of a full short set (meaning once you've reestablished your base) you're going to shift momentum and begin your drive block. The idea here is that the defender is no longer in position to fire low and hard, as he traditionally would against a run block, so you can now leverage underneath him and drive him out of the hole. This is a quicker, more aggressive point of attack method. It is important that when performing this drive block you do not allow the defender to switch gaps. If he is able to cross your body, your short set didn't provide you sufficient leverage or you didn't reestablish your base quick enough to get your aiming point.
Combo Block

Another option is to sell pass the surrounding blocks, but at the point of attack, treat it as a run block. This is traditionally done to root out the A gap defender. This gets initial movement at the point of attack to open up the hole and allows the OL to rep something traditional to them with standard combo blocking rules. The rest of the OL will display their draw influence.
Fold

Fold draw allows for the play to utilize a lead blocker without the use of a RB as that lead blocker. The fold can also be utilized with a short set and drive. In this case, the fold blocker must have a deeper set than the drive blocker (so one step deep) or the short set blocker (2 steps back) before folding. In his set, he wants to make sure to minimize the gap between himself and the drive blocker, as being split disrupts the entire scheme. On the short set - fold combo they want to stay shoulder to shoulder in their first step, and then the folder will rub right off his but as he works to the second level.
Free Release Climb

Some teams will not combo the initial block, but will only "draw influence" with the covered OL. Uncovered will work immediately to the second level, often giving a flipper or a push to ensure a defender can't work into his gap.
Away From the Point of Attack
Firm pass set: This is a relatively aggressive pass set typically used for 3- and 5-step drops to invite the pass rush. "Draw influence" is another word for it, where you are going to get two or three steps worth of depth. Initially, you must stay square; if you turn your tail to the hole, the defender can start squeezing down the run lane. Leverage will be maintained inside, firm, and no more than 45 degrees turned at contact (again, initially stay square).
Any move inside you must meet with aggression and a strong punch and anchor; this can be done if he actively attempts to work the inside half of the lineman. If he does maneuver to work even further inside than half man, then start to ride him as far inside as possible and beyond the hole. Any outside move is met with a club (the same club technique defensive linemen use, literally forming a club with your hand and hitting the opposition in the shoulder/armpit to knock them off balance) or a shot put (strong inside hand up and through the arm pit) and release/climb to the second level and find work. If he hits and reads the play (i.e. you can't drive him one way or another), start driving him away from the play or torque him away from the run.
Examples
Drive - Fold
Here's an example of a drive and fold technique. Center immediately drives the nose as the remainder of the offense sets. Neither DE gets far enough upfield to release, and instead both OTs attempt to torque the defender away from the run once engaged.

Point of Attack
The area where the block differs most from scheme to scheme is at the point of attack. Here, you cannot allow the defense to dictate terms because if they do, they blow up the whole play in the backfield. Depending on personnel and skill set, your options may differ.
Static Read Block

The is a zone combination block where two OL present a high hat but don't gain significant ground (i.e. they are static). First and foremost, they must both stay square to the LOS and must stay tight together so as not to be split. If you are covered, you are not going to gain ground laterally, but instead focus on taking your half of the defender. If you are the uncovered blocker, you will inside set to close the gap between yourself and your combo partner. You must have patience and allow the defender to go where he wants to go, do not get over aggressive and off balance, otherwise you risk getting split or not getting sufficient leverage; maintain your ground at the LOS. They do this in order to invite the pass rusher to go where he wants, but maintain strength in their firm, square base, and keep shoulder to shoulder so the defender can't split the combo. If the DL attacks outside the combo, the attack side blocker will leverage the defender out of the gap. As the other OL releases to the LB, he will flipper or push the defender so as to ensure his combo partner will maintain leverage upon release (again, you can't get split).
Drive
This is typically done to try to root out the A gap defender immediately. If your OL has difficult shifting from a pass set to a run block, just go out and run block to make sure you get movement at the point of attack and not allow the interior defenders to get penetration.

A short set is going to be at maximum a one step drop to present a high hat and get the interior defender treating it like a pass rush scenario. Upon completion of a full short set (meaning once you've reestablished your base) you're going to shift momentum and begin your drive block. The idea here is that the defender is no longer in position to fire low and hard, as he traditionally would against a run block, so you can now leverage underneath him and drive him out of the hole. This is a quicker, more aggressive point of attack method. It is important that when performing this drive block you do not allow the defender to switch gaps. If he is able to cross your body, your short set didn't provide you sufficient leverage or you didn't reestablish your base quick enough to get your aiming point.
Combo Block

Another option is to sell pass the surrounding blocks, but at the point of attack, treat it as a run block. This is traditionally done to root out the A gap defender. This gets initial movement at the point of attack to open up the hole and allows the OL to rep something traditional to them with standard combo blocking rules. The rest of the OL will display their draw influence.
Fold

Fold draw allows for the play to utilize a lead blocker without the use of a RB as that lead blocker. The fold can also be utilized with a short set and drive. In this case, the fold blocker must have a deeper set than the drive blocker (so one step deep) or the short set blocker (2 steps back) before folding. In his set, he wants to make sure to minimize the gap between himself and the drive blocker, as being split disrupts the entire scheme. On the short set - fold combo they want to stay shoulder to shoulder in their first step, and then the folder will rub right off his but as he works to the second level.
Free Release Climb

Some teams will not combo the initial block, but will only "draw influence" with the covered OL. Uncovered will work immediately to the second level, often giving a flipper or a push to ensure a defender can't work into his gap.
Away From the Point of Attack
Firm pass set: This is a relatively aggressive pass set typically used for 3- and 5-step drops to invite the pass rush. "Draw influence" is another word for it, where you are going to get two or three steps worth of depth. Initially, you must stay square; if you turn your tail to the hole, the defender can start squeezing down the run lane. Leverage will be maintained inside, firm, and no more than 45 degrees turned at contact (again, initially stay square).
Any move inside you must meet with aggression and a strong punch and anchor; this can be done if he actively attempts to work the inside half of the lineman. If he does maneuver to work even further inside than half man, then start to ride him as far inside as possible and beyond the hole. Any outside move is met with a club (the same club technique defensive linemen use, literally forming a club with your hand and hitting the opposition in the shoulder/armpit to knock them off balance) or a shot put (strong inside hand up and through the arm pit) and release/climb to the second level and find work. If he hits and reads the play (i.e. you can't drive him one way or another), start driving him away from the play or torque him away from the run.
Examples
Drive - Fold
Here's an example of a drive and fold technique. Center immediately drives the nose as the remainder of the offense sets. Neither DE gets far enough upfield to release, and instead both OTs attempt to torque the defender away from the run once engaged.
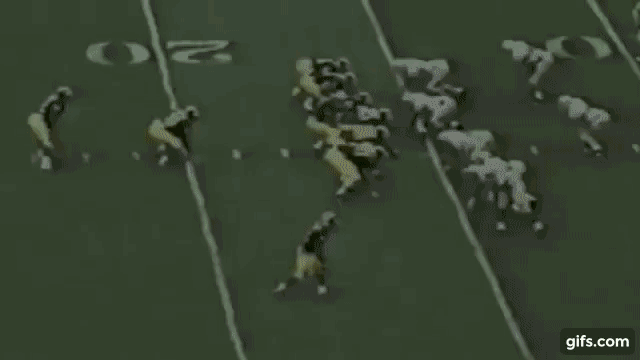
Static Set
The Center and Guard reduce the split in a short set to not allow anyone to split. Once the NT commits outside the OG, OG takes over and the Center moves to the second level.
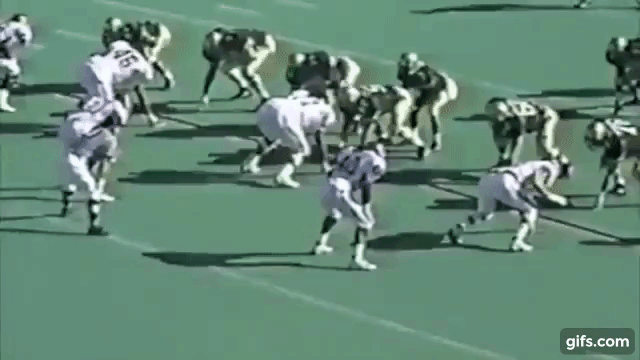
Shotput - Body Torque.
Here, watch the RG and the LT. Both are going to attempt to shotput their defenders or torque them down. The RG is going to short set, when the DT tries to get into the inside gap. Once the defender attempts that, the RG meets it with a strong punch and then torques. The LT allows the DE to work upfield, and once he gains depth, he attempts a two handed shotput the throw him beyond the play (he doesn't get a good enough push to release)
Combo
Here, the A gap is combo blocked immediately, it's only the backfield and the playside OT that sell pass. Also notice the backside OG immediately releasing to the LB.
Straight to Second Level
Watch the LG here. He gets a little more than a flipper because of the DL first step, but he hits and quickly releases to the second level, passing off the DL to the backside OT in his static set.

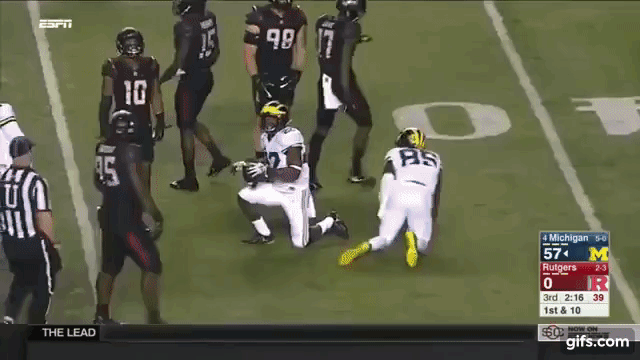
Club and Climb
There are a number of examples of club and climb to the second level here. Here's one example from that post.
And here's a lot of draw plays (including some sprint draw). See for yourself what techniques are used where.
The Center and Guard reduce the split in a short set to not allow anyone to split. Once the NT commits outside the OG, OG takes over and the Center moves to the second level.
Shotput - Body Torque.
Here, watch the RG and the LT. Both are going to attempt to shotput their defenders or torque them down. The RG is going to short set, when the DT tries to get into the inside gap. Once the defender attempts that, the RG meets it with a strong punch and then torques. The LT allows the DE to work upfield, and once he gains depth, he attempts a two handed shotput the throw him beyond the play (he doesn't get a good enough push to release)
Combo
Here, the A gap is combo blocked immediately, it's only the backfield and the playside OT that sell pass. Also notice the backside OG immediately releasing to the LB.
Straight to Second Level
Watch the LG here. He gets a little more than a flipper because of the DL first step, but he hits and quickly releases to the second level, passing off the DL to the backside OT in his static set.
Club and Climb
There are a number of examples of club and climb to the second level here. Here's one example from that post.
And here's a lot of draw plays (including some sprint draw). See for yourself what techniques are used where.

Comments
Post a Comment