Film Review: OSU's Split Zone and the 60 Y Curl
Previously, we talked about OSU utilizing split zone as a
viable way to simplify the read option game for inexperienced QB Cardale Jones.
But to move the football in the college game, you still need some semblance of
a passing threat. Rather than forcing their QB to make complicated reads or fit
the ball into tight windows, Urban Meyer and Tom Herman dialed up a simple play
action pass concept to allow Jones and his receivers to be effective while not
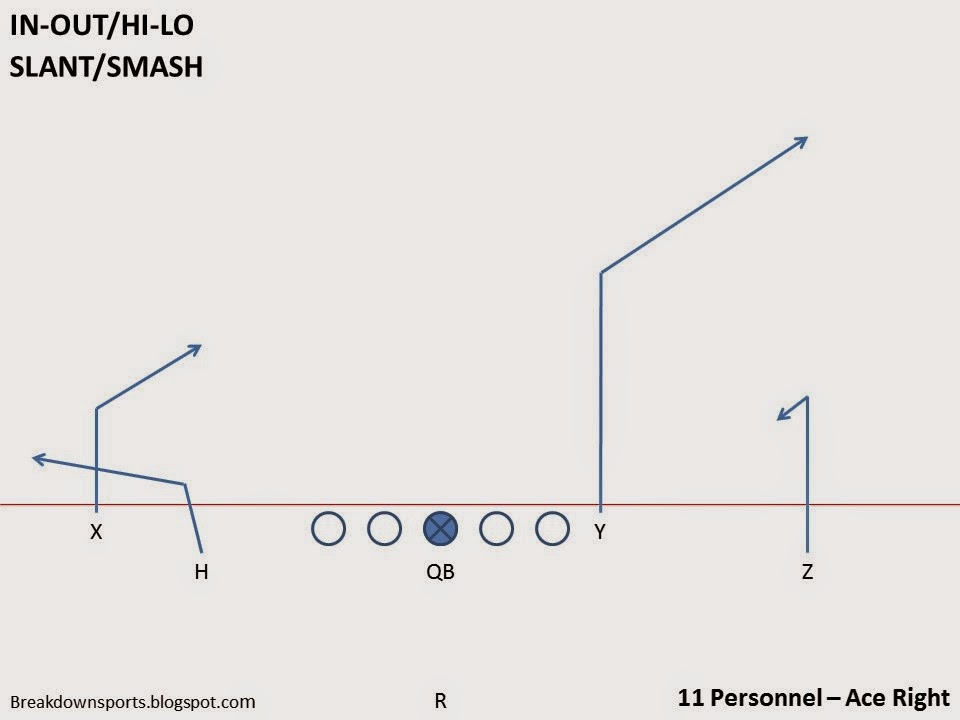
needing to over think. In this post, we’ll look how this “3-Verts” concept
works, and more specifically, how it works as a great addition to the split zone play.

Blocking
The blocking for this play is a standard 7 man slideprotection. But more than that, it works within the scheme of the split zone look. The split zone sees every OL step into the playside gap, while the H-Back
cuts to the backside of the LOS to seal the backside OLB/DE away from the play.
Within the play action element, every initial step from the front 6 is the
same: the entire OL steps to the gap toward the playside and the H-Back cuts to
the backside of the formation and seals the backside EMOL. This is great, because
each player gives the same initial look, really selling the run play, yet, the
QB is still playing inside a 6-man pocket with a clear pocket to step into. The
playaction slows the pass rush, and the RB acts as an additional blocker for anyone
sneaking through the OL. It’s a great combination of a run fake and a blocking
scheme that clears out the underneath defense and forces the backend to win
one-on-one match-ups in space.
Route Conversions
Urban Meyer tends to utilize a small number of plays but
incorporates route conversions to make those plays work against a variety of
coverages. By packaging concepts and route conversions, and maintaining a run
threat, defenses are forced to play more predictable, giving the QB is often
given more well-defined reads as WRs are able to find openings in the defense.
This also makes it a bit difficult sometimes to pare down what the actual
concept is. Here, I call the play 3-Verts, because my assumption is that, given
a certain defensive look, this play runs three verts. More likely, this is what
Meyer calls “Houston”, also known as “60 Y Curl”. In the past, Meyer has
utilized this as a four or five man concept, but to reduce the reads for the QB
and fit it within the split zone look, Herman and Meyer reduced it to a
three-man concept. To make it so this play can work against any defense, route
conversions are necessary.
5-Man Houston Concept

Boundary 1 (B-1)
The WR to the boundary runs what is known as a “Speed Post”.
The stem initially works toward the sideline to push the defender outside and
open up the field for an inside break. Against a press corner, this route
converts to a “Take Two” Corner route, which essentially stems inside to gain
outside room for the corner route.
Boundary 2/Field 4
(B-2/F-4)
Depending on the alignment of this receiver (backfield, WR,
TE), changes the route a little bit, but the theory is still the same. If
attached to the LOS or in the backfield, the first responsibility is to block.
Once it is deemed that the extra protection isn’t needed, the receiver runs a
spot route over the B-Gap, and works toward the field if that’s covered. If
this is a receiver, he’ll immediately go out into a route.
Field 3 (F-3)
This receiver will run a flat, arrow, or swing route,
depending on his alignment. This helps form a triangle to the field. This also
acts as a built-in hot in the event that a blitz can’t be picked up.
Field 2 (F-2)
The slot receiver runs what is known as a bender. A bender
route presses the seam before identifying the safety coverage. If there is no
safety or if the safety is flat footed, he will attempt to win the route over
the top. Against a 2-high safety coverage, the receiver will throttle down at
about 12 yards and bend the route inside toward the hole in the defense.
Against a single-high safety, he will continue to work down the hash. The goal of
this route is to hold the defense in the middle of the field.
Field 1 (F-1)
This receiver will run a curl route. The route is designed
to get the defender turned by running 7 steps vertical to sell the Go, then
four steps on the post, before breaking back to the ball.
Converting to a 3-Man
Concept
Reducing the number of options means that several things
need to change, including the sight-adjustments of the routes and the QB’s
progression.
Boundary 1
This route is slightly changed to provide a hot option for
the QB and to provide a dump off look if the defense plays soft.
Against any engaged coverage, where the WR can get even with
the CB, he maintains the post route. If the CB plays press coverage with
outside leverage, the WR converts to a Take Two Corner route. However, if the
WR gets the CB to bail, he will convert his route to a comeback route.
Boundary 2
This player acts as the cut blocker on the split zone play
action fake.
Runningback
Sells PA, goes into 7th man pass protection. If
clear, can leak.
Field 2
Same bender rules as stated in the 5-man scheme.
Field 1
There are two reasons this route needs to have more
adjustments: 1) to provide a potential hot option to the field side for the QB;
2) because there is no receiver holding the underneath coverage to prevent the
curl route from being jumped.
Against any retreat or off coverage, a curl route is still
run; sell the streak and post routes. Against any cloud leverage where the CB
squats, the route is converted to a go route, leaving enough room to fade to
the sideline (can also potentially run a stop-and-go) because in theory, the
underneath coverage isn’t run off in the seam and the outside CB easily break
underneath the curl (and the CB keeping flat footed means he’ll have trouble
keeping up on the streak). Against press man, widen the defender and run a
slant inside, replacing the defender (this converts the play into a quasi-“Texas”
concept).
QB Movement Key and
Progression
Hot = Comeback from B-1 or Slant from F-1
Depending on where the pressure is coming from (field or
boundary) allows the offense to dictate where they throw the hot. Each receiver
will have a hot defender they are responsible for seeing to make the
appropriate hot adjustment (they also have a sight-adjustment defender to
adjust their nominal routes), and depending on which defenders can be accounted
for by the protection, that can change.
Movement Key: FS (Field Safety) to CB
As seen above, in the 5-man scheme, the movement key changes
based on the look of the safeties and then at least one additional defender. The
first thing in the progression is to diagnose the safeties. If it’s One-High
safety, which safety is dropping deep center and which is coming up; if it’s
two-high safeties the read goes to the field.
If the boundary safety rotates down, the read goes to the
field; if the field safety rotates down, the progression starts at the
boundary.
Running vs Different Coverages
Here the SS rotates down, so a one-high safety read is
fairly easy to make. Depending on the CBs leverage and cushion, the B-1
receiver can run a speed post or a comeback route. In the design in the figure,
the CB remains even with the WR, so B-1 tries to burn by him and get over the
top.
Meanwhile, the bender route from F-2 is getting over top of the NB. This
leaves the FS in a bind for who to play, and the QB will read the movement of
the FS and throw opposite.

Cover 1 Invert
Here, the FS is coming down into the box while the SS works
the deep center of the field. This immediately means that the field portion of
the field won’t have over the top help, as the safety needs to work back to the
center of the field. With the safeties momentum taking him away from the field,
the progression can start from the field side and work back across to the
boundary. The bender runs off any underneath coverage threat, which means as
long as the CB over the F-1 is over the top, the receiver should be able to
work back to the ball. If F-1 is covered, the safety can be picked on between
F-2 and B-1.

Cover 1 Press NB Blitz
This setup shows two things: how the receivers handle press
coverage and the hot-route adjustment for F-1. In this case, the NB is coming
off the edge (the NB is the hot read for F-1), forcing the SS to pick up the
slot in coverage. The NB is a difficult blitz pick up for the H-back, so a hot
route adjustment is helpful. In this case, the adjustment works similar to what
is known as a “Texas” concept in the WCO, where the underneath coverage is run
off by a bender and another receiver runs a slant/angle route into the void
where he can catch and run in space. Assuming the BCB is pressed as well, B-1
will attempt to win over the top.

Cover 1 COBRA
This setup shows two things: how B-1 adjusts to a hot route
and also how he adjusts to off coverage. The BCB is B-1’s hot read, and if he
flashes on a blitz, B-1 immediately can convert to a hitch/comeback route. In
this scenario, because the FS has to come over the top, he is also playing off
coverage, but even if it’s the CB playing off coverage, the route is converted
the same way. This benefits from the play action element and the split zone
look from the H-back, both of which draw up the coverage away from this
underneath area.

Cover 2
Cover 2 is often a very dangerous coverage against spread
teams because it is so easy to get vertical. Well, that’s why these route
adjustments are designed within this scheme. If the FCB is rolled up and squats
underneath, the F-1 can convert his route to a go route, leaving enough room to
the sideline for the QB to fade him; along with the bender, this puts the Field
Safety in a bind. B-1 converts his route to a Take-Two corner route, which
sells the quick slant to force the safety to come up and defend the inside
release, and further open up the sideline when he runs the corner.

Cover 3
With the coverages shown above, we’ve defined all the
receiver route adjustments, so now we can look specifically at different
coverages. In Cover 3, the CBs will tend to play off to maintain over the top
cushion. This allows both outside receivers to come back to the football. In
this case, he’ll work boundary to field, with the understanding that the Bender
route typically will open up the curl zone for the field safety when you work
back to the field (therefore, the F-2 should be treated more as an alert in the
progression).

Cover 3 Invert
Invert the safeties and just change the progression. Now the
progression works from field back to the boundary. Here, again, the Bender is more
of an alert. If the F-2 can get over top of the coverage with the Bender, than
the throw can be made, but the nominal progression will hit F-1 on the comeback
route.

Cover 4 MOD
Note here that the CBs are playing off, so the routes
comeback to the QB.

Cover 4 MEG
Press coverage, so the outside receivers adjust their routes
accordingly.

Video
Note here that the boundary safety has crept up to the outside of the LOS to form a 7-man box. The pre-snap alignment gives Jones all the reads he needs. He understands that the bender will be a hard throw to complete, and the FCB on F-1 is playing off. So he immediately goes right to the F-1 for an easy (albeit a bit late) completion. Also note that B-1 feels he's getting even with the BCB and runs a post.
This starts as a two-high safety look, but the alignment of the safeties tips a single-high coverage (note how tight inside they are, this often means some sort of Cover 1/3 Robber). Again, the boundary safety comes down at the snap, which Jones reads, and so his eyes go immediately to the field. With the Bender not open, he locks onto the Comeback route from F-1. He's very late this time, but the WR does a great job coming back to the ball and helping out his QB. The underneath coverage being either run off by the slot of occupied by the run fake allow for this sort of thing. Note that this time B-1 runs a comeback route as the BCB is playing over the top.
This time Wisconsin switches their tendencies and this time drops the Field Safety down into the box. Jones will see this and know that his first read will go immediately to the boundary now. Here, the BCB bails immediately at the snap, fearing that B-1 will win over the top. This provides an easy sight-adjustment for B-1, who coverts to a comeback route, and OSU is in business moving the chains based off a quick and easy read.
Wisconsin again brings the Field Safety down into the box. Jones doesn't really care about the PA or footwork here, and it's still a pretty easy completion just as it is above.
OSU also ran this play for two TDs against Michigan State's Cover 4. Here, MSU runs their standard press coverage on the outside. B-1 can't win over the top so converts to an in/hitch route to occupy the BCB. Meanwhile the Bender from the slot pulls the safety to the middle of the field, forcing the FCB to play in all kinds of space alone. By stemming outside, F-1 sets up the FCB and is able to fight back inside (mostly because the footwork from the CB does not allow him to maintain inside leverage as he doesn't have the functional strength, allowing the WR to cross him), which, one missed tackle later results in a TD. The PA, for what it's worth, completely draws the boundary safety up into the play.
The Buckeyes would immediately go back to the play, though, interestingly, they switched boundary and field, this time to pick on a weakness at the boundary safety position of the Spartans. The PA fake draws up both safeties and allows the Bender to get over the top. All that needs to be done is the ball put up in a place for the receiver to make a play, and Barrett does one better, putting it in a perfect spot.
Conclusions
What you see is a play that is nominally a four or five man route concept easily converted into a 3-man route concept by simply adjusting some routes. In Barrett's first game in a very hostile environment, against an aggressive defense, Herman and Meyer dialed up this play on separate occasions for great results. When Jones was forced into the lineup in a big time game, they once again went back to it and once again had great results.
This is able to be accomplished because of the superb run threat that this offense provides. By sucking up defense to the run threat and combining play action elements that match the split zone, the underneath coverage is forced to respect the run. This isolates defenders on the outside, and by having simple sight adjustments for the receivers, it becomes nearly impossible to defend these isolated pass threats. This is how this offense works as a full system, and how the Buckeyes have seemingly put in QB after QB and maintained great results.
LINKS
Coach Hoover goes into a lot of depth with the 5-man Houston Concept
Eleven Warriors talks about it as part of the Herman/Meyer standard Route Concepts
LINKS
Coach Hoover goes into a lot of depth with the 5-man Houston Concept
Eleven Warriors talks about it as part of the Herman/Meyer standard Route Concepts

Comments
Post a Comment