Inside the Playbook - Michigan's Counter Game - Part 1 - Scheme and Run Tags
While the most utilized run scheme for Michigan throughout the duration of 2021 may have been Inside Zone (specifically, split zone), it was Counter that ended up as their most effective play. This post is going to look at how Michigan utilized a few counter schemes and a number of tags in order to execute the play at a high level. We’re also going to look at a few variations that they included to break tendencies, and a few other plays that serves as protection for the rest of the playbook.

The Counter Concepts
There are really four core calls for Michigan’s counter
scheme: Counter OH/OF, Counter OT, Counter CH, and “Gift”.
Counter OH/OF
Counter OH and Counter OF are effectively the same play,
with the difference being the initial alignment of the wrapper. F = Fullback
and tends to be deeper in the backfield. H = Half back and typically aligns off
the OT or TE. In each instance, they align opposite the play direction. But
otherwise, the tags and calls are the same between the two plays.
 |
| Strong Side Counter OF from Pistol with a Frontside Handoff |
 |
| Weakside Counter OH with a Backside Handoff |
The typical way this play is executed (more on this later)
is for the opposite guard to pull across the formation and kick out the defensive
End Man on the LOS (EMOL) that tends to serve as the defenses force player. The
“wrapper” will come from the opposite side of the formation and lead up to the
playside linebacker, serving as a lead blocker for the ball carrier. The front
side of the defense will then execute down blocks and combo blocks to attempt
to seal the rest of the defense inside. Michigan ran this play from a variety
of formations, running it both to the in-line TE and away from the in-line TE.
Counter OF:
Michigan
— TalkingDogBDS (@TalkingDogBDS) May 29, 2022
Unbalanced Strong Counter OF pic.twitter.com/2iNDitEmoV
Counter OH:
Michigan
— TalkingDogBDS (@TalkingDogBDS) May 30, 2022
Open Counter OH pic.twitter.com/iQUPrO8E0u
Counter OT

Their second most favored Counter scheme was Counter OT. Counter
OT, in theory, is generally the same play as Counter OH/OF, but the opposite
tackle subs for the H/F to become the wrap player. So now, the opposite guard
is kicking out the EMOL, while the opposite Tackle is wrapping to the playside
LB. While this play used to be executed with a back accounting for the backside
EMOL with a block, that block is now often substituted for a read. Again, they
would run it both to the in-line TE and without an in-line TE.
Counter OT - Note here the Guard logs the EMOL. We'll talk about that more in Part 2:
Michigan
— TalkingDogBDS (@TalkingDogBDS) May 29, 2022
Open Opposite Counter OT pic.twitter.com/MLZPhEVeAh
Michigan primarily used Counter OT against odd fronts and when they wanted to utilize the QB as a run threat.
Counter HF
This was only used against Wisconsin when Michigan wanted to avoid pulling OL. It basically substitutes the use of a second back as the puller to replace the Guard in Counter OF. More details here.
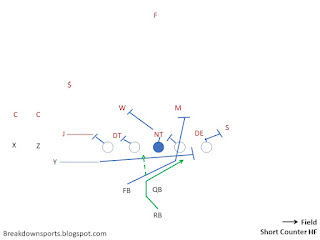
Michigan runs Counter HF, a combination of Counter without a puller and scissors Iso. Allows backside to play more aggressive, and Michigan punches it thru for a 7 yard gain pic.twitter.com/85tlsXw87p
— Space Coyote (@SpaceCoyoteBDS) June 21, 2022
“Gift”

Gift is Harbaugh/Greg Roman vernacular. It can also be
called “Long Trap”, but is essentially an offshoot of Counter OH. Here, a
playside TE (either off the LOS or On the LOS) will bluff block the EMOL and
then work vertical to the playside LB. The opposite guard will kick out the
EMOL, so on paper, the assignments are exactly identical to Counter OH, with
the only difference being how the TE gets into his block.
Gift (note the center is pulling here, we'll get back to this in the next section):
Michigan
— TalkingDogBDS (@TalkingDogBDS) June 4, 2022
Open Opposite Counter C (H bluff) pic.twitter.com/5O6ZgoG1uh
This was used as a tendency breaker, as the H aligns to the play direction.
The Tags
Run tags are line calls that allow the play to deviate from
its baseline to more optimally block the defense. They can be slight changes in
assignment, swapping assignments, or adding to the play.
Guard or Center Pull
The most common tag that Michigan executed is making Counter
OH become Counter CH, as in, having the Opposite Guard and the Center swap
assignments. This is done based on the alignment of the defensive line based on
technique.

If there is a backside 1 or 2 technique, the guard will be
the puller and the center will block back. But if that defender is a 3-technique
or a 4i, the path becomes really far and really flat for the Center. There are
a few reasons that isn’t optimal: 1) the defensive lineman can attach himself
to the butt of the puller and skim by the block, chasing the play down from the
backside (pun intended?); 2) Because the center has to get so flat, any collision
or misstep can result in him and the puller impacting, disrupting the front
side of the play; 3) Because the Center has to be in such a hurry to block
back, and be so flat, many times the defensive lineman can give up some ground
and actually beat that block from the Center, allowing him to start closing
down gaps playside.
Tagging to pull the Center on Counter OF (Counter CF) - Note here the Center Logs the DE, we'll talk about that more in Part 2:
Michigan
— TalkingDogBDS (@TalkingDogBDS) June 3, 2022
Open Counter CF pic.twitter.com/YwIj8Hlia6
Depending on how well you execute, the Center pull can also
have more optimal impacts, or in other words, there are benefits to pulling the
center other than trying to mitigate suboptimal aspects of pulling the guard.
The primary is that the Center pull gets to the point of attack quicker than
the guard, giving the defense less time to react. Reactive defenses that adjust
to playing a puller can struggle to execute their assignments when they read a
down block but aren’t able to react to the puller reaching them so quickly.
Tagging to pull the Center on Counter OH (Counter CH):
Michigan
— TalkingDogBDS (@TalkingDogBDS) May 29, 2022
Open Opposite Counter CH pic.twitter.com/YT3d6Da6k9
However, this can also be a downside for the Center, as he
has less time to react than a guard would as well. So this point of strength
really depends on how well your center can execute (Michigan was blessed with a
Center that executed this at a high level). Other challenges include the center
having the snap and then execute a pull, which can often be difficult. It can
also have challenges against defenses that feature a lot of line movement and
slants, because if a backside 3-technique slants across the BSG’s face, it is
going to be challenging for the playside to build a strong enough wall to avoid
gaps starting to close on the interior.
Tagging to pull the Center on Counter OT (Counter CT) - Note there is a backside RPO, we'll talk that in Part 2:
Michigan
— TalkingDogBDS (@TalkingDogBDS) June 4, 2022
Open Opposite Counter CT with Hitch-Flat RPO pic.twitter.com/2t7GlpJaoW
Frontside Arc Block
The primary time the frontside Arc block is used is in “nub”
formations. What is a nub formation? Nub is an offensive formation that doesn’t
have a WR on that side of the ball. In other words, everyone on that side of
the ball is “attached to the formation” or “attached to the offensive line.”
This can be just a single TE, or it can be a TE-Wing combination.

Nub formations have several benefits, but from a run game
perspective it: 1) allows you to extend the surface (surface is the number of
blockers attached to the formation on that side of the ball, so OG-OT-TE-Wing
would be a four man surface) which can impact run fits; 2) It often puts a CB
into the run fit, or otherwise well defines how the defense intends to fit the
run (account for run gaps) on that side of the ball. Offenses like CBs in the
run fit generally, because to paraphrase an NFL coach “CBs suck at tackling at
our level just like they do at yours.”
Michigan
— TalkingDogBDS (@TalkingDogBDS) May 29, 2022
Strong Counter OH (with short motion) pic.twitter.com/4iWg8CnMxs
As I said, the nub formation will often force the defense to
declare who of the DBs is in the run fit, and that defender typically has to
align at LB level. This forces them up in the box and identifies them as someone
that needs to be targeted by the blocking scheme. But rather than trying to
block a DB with an OL and a DL or LB with a TE, the arc block allows you to
account for playside numbers while maintaining Big-on-Big blocking (i.e. you’re
not asking an OL to try to block an athletic CB in space).
There are three other primary reasons you’d use a front side
arc block. Even without a nub formation, a lot of teams that play 2-high, cover
4 defenses will have the safety responsible for the playside alley. The arc
block allows the offense to account for that safety spinning down without
forces an OL or wrapper to find a new target that isn’t there pre-snap. This
method can also be used by teams that will trade efficiency for explosiveness
will do this, trading blocking a backside player to block up the front side.
The second primary reason is a 6-technique DE. One of ways
defenses found was best for stop gap schemes was to put a defensive lineman
right over top of the tight end. This makes it very difficult for the TE to pin
the defender inside and prevents a front side double team. So rather than force
the TE to try to execute that block, you have the TE arc outside of him. To the
DE right above him, this simulates two things: a potential reach block, to
which he needs to react to and widen, or a route release, of which he’ll want
to widen to benefit his pass rush. Either way, it often will widen the DE to
help the kickout block, while still blocking up the playside.
Michigan
— TalkingDogBDS (@TalkingDogBDS) June 3, 2022
Strong Opposite Counter OH pic.twitter.com/QxHJiS6n7i
The third reason is if there is a defender aligned in the
three outside gaps (so D-C-B gaps to the TE). In this case, the double team
will come on the B gap defender, between the PST-PSG. This means the TE alone
is responsible for moving the C gap defender. This can be a challenge to
provide a good path for the kickout block to the D gap defender. So rather than
rely on the TE to get great movement, you can block out on the D gap defender
with the TE, and let the kick blocker work behind the combo block, which should
do better in clearing the path to the defender.

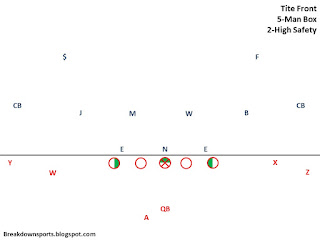
Short Counter OH is typically an odd front adjustment. But with how slant heavy PSU is on defense, it makes sense not to subject the TE to that match up. So he bluffs his down block and then blocks the SAM. DE runs himself upfield and out of the play pic.twitter.com/BY0pg01wj8
— Space Coyote (@SpaceCoyoteBDS) February 28, 2022
Bonus/Load/Lead
West Coast Offense people call it “Bonus”, Option offenses
call it “load”, I tend to call it “Lead”. Regardless of what you call it, this
is just gaining another blocker at the point of attack. Wisconsin in their
heyday thrived with this concept. Michigan dabbled in it in a few ways.
WR Load

Here, Michigan motions in a WR from the opposite side of the
field and wraps him playside. Defenses at the college level often have a relatively
limited way of reacting to “jet” motion, especially in one-high or two-high. If
you understand how they will react, and if that reaction often results in
spinning down playside defensive backs, you can tend to use this “motion” to
widen this playside support and account for them in the blocking scheme with
the WR, so that the core of the formation can execute their standard
assignments. So in essence, you’re trying to craft a bit more explosive version
of the play, often bringing another defender down, but making their ability to
support the run.
Michigan
— TalkingDogBDS (@TalkingDogBDS) May 29, 2022
Strong Counter CH with Jet to pic.twitter.com/WX59Qzm2CH
Wing/FB Bonus

Bonus is effectively doing the same thing as load, but just
utilizing another blocker from the backside of the play and brining them
playside. This does not induce same defensive reaction as WR load because the
defense isn’t reacting to the jet motion, but it does work to add another
blocker to the point of attack to account for defensive backs spinning down or
otherwise finding ways to get defenders playside. A typical defensive reaction
is to match pullers with LBs so they can “bracket” the lead blocker (a defender
on both sides of lead blocker means the defense is “gapped out”, or in other
words, regardless of which way the ball carrier goes, there is a defender). By
adding a second lead blocker, you force the defense to account for another
puller, often with someone farther to the backside of the play.
Bonus Counter OH (with short motion from F):
Michigan
— TalkingDogBDS (@TalkingDogBDS) June 3, 2022
Open Load Counter CH pic.twitter.com/Y137MQefn9
This does have it’s downsides, here’s two examples of
Illinois in short yardage situations, first with Bonus, and then scrapping the
Bonus tag to prevent the backside of the play from collapsing.
Illinois
— Space Coyote (@SpaceCoyoteBDS) January 19, 2022
Power Bonus on 3rd and 1. Need to check vs 2 outside weak when you have two man surface. RT can get a bit broader on hinge block, but path to downhill run too short. Need to keep H back backside or check out (or find way to add a read) pic.twitter.com/E2UB2xeK4S
Illinois
— Space Coyote (@SpaceCoyoteBDS) January 19, 2022
4 min drill. Same formation as Power Bonus. This time they keep second H back to hinge. Get RB on CB pic.twitter.com/40yjtZ3oez
Short Counter
“Short” is typically an odd front response and can be
executed with and without a TE. One of the main challenges of the Odd front is
how to deal with the NT above the Center. Because he can either direction, it
becomes difficult to block him with a single block from the C. That generally
means you want to bring the OG in for support, and combo block the NT to the
BSLB.

What this means in an odd front is that the PST will have a
single block against a 4i or 4-technique. A 4i-technique with an OT may be
manageable, but it isn’t always a great blocking angle to get a lot of movement
and clear a path to kick out an athletic OLB. A 4-technique has the same
challenges at a 6-Technique vs a TE, a head up position provides him a two-way
go and makes it a lot of work to be able to torque him inside and seal him.
So rather than live in ambiguity if that block can be
executed and rather than allowing the more athletic OLB work in space vs a
pulling OL, you “bluff” the DE causing him to freeze and prepare to take on the
block, then work out to the OLB quickly and have the OL kick the 4-technique
DE. This presents new challenges for the defense, especially if they want to
spill with the OLB, because now the DE needs to spill. Additionally, if ILBs
are scraping hard over the top, this can punish them for over-pursuit.
So “Short” Counter effectively becomes the A-Gap Power of
the counter world.
Michigan
— TalkingDogBDS (@TalkingDogBDS) June 4, 2022
Strong Opposite Short Counter OH pic.twitter.com/FKOoBX94gu
Here it is with a TE
Cool way of maintaining Big On Big on Counter OH without allowing the Jack to dictate the kick block. Release Y to Safety, which invites Jack upfield to be kicked by RT. Short trap the 4i and lead behind. Hits a bit more downhill. They did similar at Bama pic.twitter.com/UKXG4JT9je
— Space Coyote (@SpaceCoyoteBDS) March 18, 2020
Elsewhere
Michigan doesn't really have that type of runner at QB, but all these same things can be applied to QB Counter (we'll talk about read elements in Part 2).
For instance, Bonus Q Counter OT:
2020 Texas
— Pace N Space (@PaceNSpace6) July 31, 2022
-2x2 Stack of TEMPO
-Q Counter Trey
-BST Hinges using BSG & TB as Wrappers
-Simple Box Count for QB. 5 man Box = QB just runs it
-Effects of Tempo causes a DL to Sub by mistake. Defense actually only has 10 Players on Defense pic.twitter.com/rYxK1fMFCM
Or more succinctly, the Bill Snyder Playbook


I think this is what you’re referring too from @NoahRiley21 book pic.twitter.com/kXguC6H7Zp
— Jacob Morris (@ocjacobmorris77) March 11, 2022
Six tags @OU_Football utilizes within their counter concept. Similar blocking scheme up front, with multiple tags makes it simple for the offense and tough on opposing defenses. @NoahRiley21 "Breaking Down the 2018 Oklahoma Offense"@CoachKGrabowski @CoachDanCasey @CoachSamz pic.twitter.com/No8kjmGXFb
— Austin Pink (@austinpink2) October 23, 2019
For what it's worth, Oklahoma is the preeminent go-to for Counter OT examples (search counter GT because a lot of people call it that).
Next Time
Next time we are going to talk Post-Snap modifiers, include run reads, RPOs (this will probably feature some OU as well out of their Counter OT scheme), and ways that Michigan protected their counter scheme (Play Action, Sweep, Reverse, Insert, etc.). Then in part 3, we will try to look at some of the nuances of their execution to show why they were so good.

Comments
Post a Comment