Run Concepts
Gap/Man Schemes
Gap and Pull Plays - Goes over the different plays that utilize pulling OL
Power O

Power O Primer - Goes over the fundamentals you need to know to run Power O
Power O - Goes over specific assignments and blocking multiple fronts
Multiple Power O Attack - Goes over how to incorporate Power O schemes in a variety of ways
Pin and Pull and Zone/Gap Combo
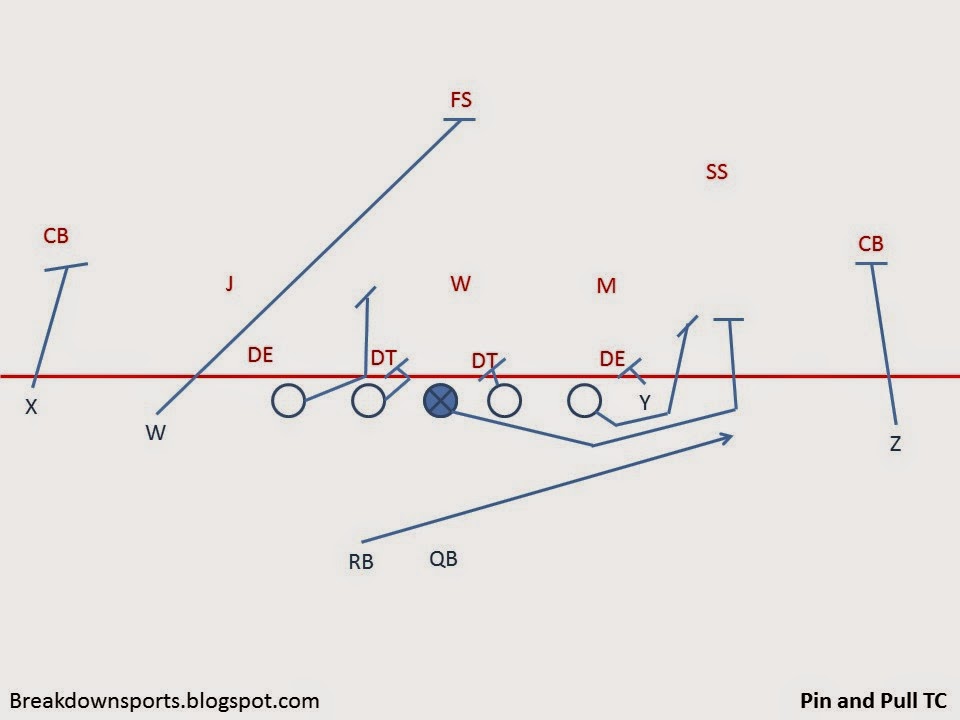
Pin and Pull - Fundamentals of Gap/Man Tag, Outside Zone variant
Inside Zone Pin and Pull - A look at the Inside Zone variant
Down G - A look at a Pin and Pull Tag for handling Defensive EMOL
Draw Play

Bounce Draw - Describes a draw play which aims to get to the sideline.
Draw Blocking Techniques - Looks at classical draw blocking technique
Draw Plays - A look at various draw play designs
Option
The Evolutionary History of Option (External Link) - SBNation by Bill Connelly and Matt Brown
Zone Read Option
Multiple OZ Read Option Attack - How to attack any defender with OZ read scheme.
Multiple IZ Read Option Attack - How to attack D with IZ read scheme.
Multiple RBs in Zone Read Scheme - Attacking Defenses with Multiple RBs and Zone Read
Arc Belly Read - A follow on to the Split and Arc Zone Read
Book and Bible - A look at a zone run variant where the backside blocker blocks backside force
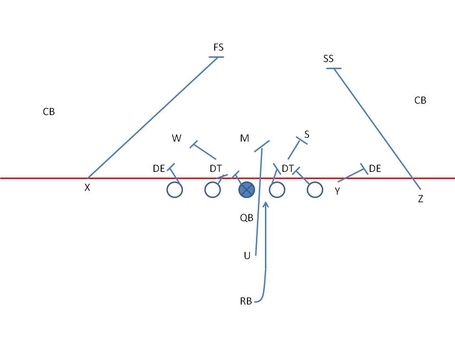
Gap Read Option
RPO
RPO Run Schemes - Overview of the various kinds of read plays
RPO Concepts - Overview of the various RPO schemes
Speed Option
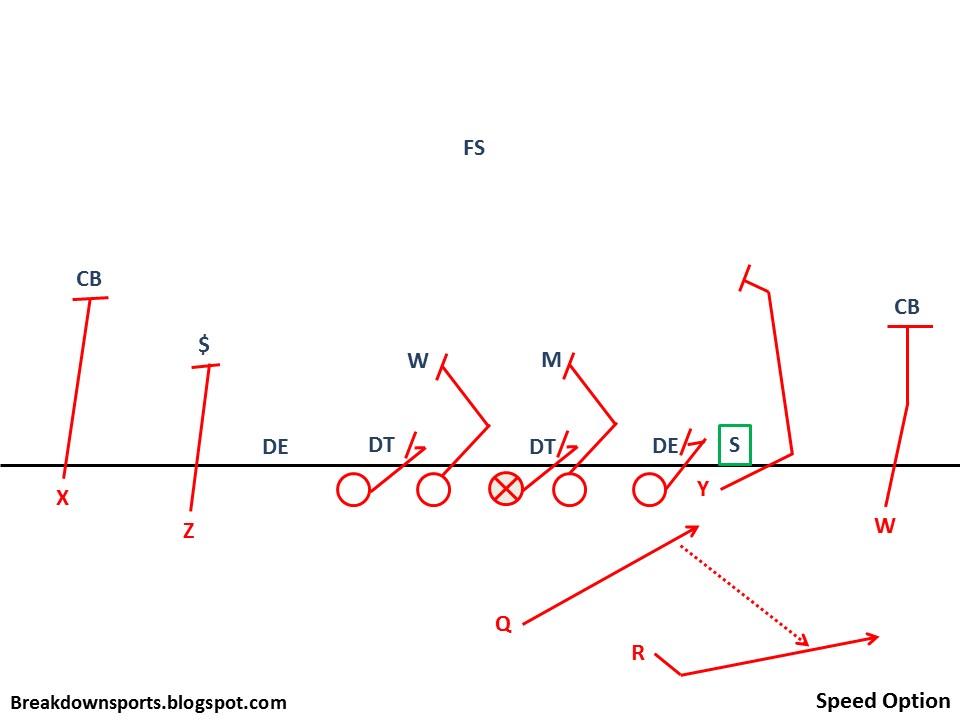
Speed Option Package - A look at a package to implement with Speed Option base
Defending Speed Option - Single-High Safety
Defending Speed Option - Two-High Safety
Veer

History and Evolution - Goes over the evolution of the Veer Option play
Belly

History and Evolution - Goes over the evolution of the Belly play
Elsewhere
Formation Runs
2-Back Run Schemes from Spread
2-Back Run Schemes - A wrinkle for spread teams to add run game variety
I Formation Run Plays
This is a series post with lots of play diagrams. Where it lacks depth, it hopefully makes up for with breadth. The goal of this post is to demonstrate the many run game nuances that are at your disposal, outside the very basics that you can find almost anywhere. I will point out some key attributes for the plays, but for the most part the diagrams will stand alone outside a brief description. This post is limited (out of necessity) to strongside plays that are given directly to the RB. It does not include FB runs, or QB runs, or H-Back, Wing, TE, or WR runs. It also doesn't include option plays. Those are things for future posts.
RB Give
Elsewhere
Gap and Pull Plays - Goes over the different plays that utilize pulling OL
Power O
Power O Primer - Goes over the fundamentals you need to know to run Power O
Power O - Goes over specific assignments and blocking multiple fronts
Multiple Power O Attack - Goes over how to incorporate Power O schemes in a variety of ways
History and Evolution - Part 1 - The Power Series Origins
History and Evolution - Part 2 - Off Tackle Power Earns the Name "Power"
History and Evolution - Part 3 - The Modern Era of Power Diversity (Multiple Backs, Reads)
History and Evolution - Bonus - How Zone Offenses Integrated "Power"
A-Gap Power - Looking at the A-Gap Power Variation
Power Bonus Part 1 - Goes over adding a Bonus Blocker from the backside of Power
Power Bonus Part 2 - Goes over adding a Bonus Blocker from the backside of Power
Elsewhere
Counter

Counter OH/OF Primer - Goes over the fundamentals you need to know to run Counter H/F
Counter Plays - A look at different counter run play designs
Counter OH/OF Primer - Goes over the fundamentals you need to know to run Counter H/F
Counter Plays - A look at different counter run play designs
Counter Package Part 1 - Goes over a full Counter Package of OF, OH, OT, HF, and O
Counter Package Part 2 - Post Snap Modifiers (Blocks, RPOs, Etc.)
Counter Package Part 3 - Execution and Technique
Counter HF - Goes over the "Pull Replace" run Counter HF
Counter Bonus Part 1- Looks at adding a Bonus blocker to Counter OH
Counter Bonus Part 2- Looks at adding a Bonus blocker to Counter OH
Elsewhere
A Million ways to run Counter (Ian Boyd, Football Study Hall)
Iso
 Iso Primer - Goes over the fundamentals you need to know to run Iso
Insert Iso - Briefly covers running Isolation from Shotgun
Isolation Plays - Goes over the different types of Iso Runs
Iso

Insert Iso - Briefly covers running Isolation from Shotgun
Isolation Plays - Goes over the different types of Iso Runs
Counter Iso - Also known as "Bend" or "Scissors"
Duo
Duo - Shares many links on the basics of Duo
Duo with Club Block Call - Featured heavily in many Duo Schemes
Elsewhere
Dart
Elsewhere
Zone Blocking

Introduction - Look at the high level basics of a zone blocking scheme
Six Types of Zone - Belly, Tight, Inside, Mid, Outside, Wide zone scheme primer
Utilizing Multiple Backs - Looks at adding variety to your zone scheme by using a FB/HB.
Multiple OZ Read Option Attack - How to attack any defender with OZ read scheme.
Multiple IZ Read Option Attack - How to attack D with IZ read scheme.
Multiple RBs in Zone Read Scheme - Attacking Defenses with Multiple RBs and Zone Read
Split and Arc Zone - Looks at combining Split Zone and Arc Zone Blocking
Arc Belly Read - A follow on to the Split and Arc Zone Read
Book and Bible - A look at a zone run variant where the backside blocker blocks backside force
Zone and Zone Counter Plays - A look at the different zone and zone counter play designs.
History and Evolution - Bonus - How Zone Offenses Integrated "Power"
Elsewhere
Pin and Pull and Zone/Gap Combo
Pin and Pull - Fundamentals of Gap/Man Tag, Outside Zone variant
Inside Zone Pin and Pull - A look at the Inside Zone variant
Down G - A look at a Pin and Pull Tag for handling Defensive EMOL
Arc Down G - A look at a TE-Wing combination in which the Wing Arc Blocks
Zone/Gap Combo Plays - A look at the different zone/gap combination play designs
Zone/Gap Combo Plays - A look at the different zone/gap combination play designs
Elsewhere
Unbalanced Down Scheme in the Wing-T Offense (Blitzology)
Fold, Trap and Wham
Primer - Look at the high level basics of plays that utilize Trap and Wham blocks
Fold and Trap Plays - Goes over the various Trap Plays
Fold, Trap and Wham
Primer - Look at the high level basics of plays that utilize Trap and Wham blocks
Fold and Trap Plays - Goes over the various Trap Plays
Elsewhere
Draw Play

Bounce Draw - Describes a draw play which aims to get to the sideline.
Draw Blocking Techniques - Looks at classical draw blocking technique
Draw Plays - A look at various draw play designs
Elsewhere
Fullback Draw: A Constraint Play for Sprint-Out Pass (Smart Football)
Jet Sweep

Blocking the Jet Sweep - Multiple ways for blocking the sweep
Jet Sweep
Blocking the Jet Sweep - Multiple ways for blocking the sweep
Jet Sweep Package - Multiple OL Blocking Schemes in a Fake Jet Sweep Playbook
Option
The Evolutionary History of Option (External Link) - SBNation by Bill Connelly and Matt Brown
Zone Read Option
Multiple OZ Read Option Attack - How to attack any defender with OZ read scheme.
Multiple IZ Read Option Attack - How to attack D with IZ read scheme.
Multiple RBs in Zone Read Scheme - Attacking Defenses with Multiple RBs and Zone Read
Arc Belly Read - A follow on to the Split and Arc Zone Read
Book and Bible - A look at a zone run variant where the backside blocker blocks backside force
Gap Read Option
Many Iterations of Power O - Goes over various Power Read designs
RPO
RPO Run Schemes - Overview of the various kinds of read plays
RPO Concepts - Overview of the various RPO schemes
Speed Option
Speed Option Package - A look at a package to implement with Speed Option base
Defending Speed Option - Single-High Safety
Defending Speed Option - Two-High Safety
Veer
History and Evolution - Goes over the evolution of the Veer Option play
Belly
History and Evolution - Goes over the evolution of the Belly play
Elsewhere
Power Read
Zone Read
Speed Option
BASH
Gadget
Elsewhere
Formation Runs
2-Back Run Schemes from Spread
2-Back Run Schemes - A wrinkle for spread teams to add run game variety
I Formation Run Plays
This is a series post with lots of play diagrams. Where it lacks depth, it hopefully makes up for with breadth. The goal of this post is to demonstrate the many run game nuances that are at your disposal, outside the very basics that you can find almost anywhere. I will point out some key attributes for the plays, but for the most part the diagrams will stand alone outside a brief description. This post is limited (out of necessity) to strongside plays that are given directly to the RB. It does not include FB runs, or QB runs, or H-Back, Wing, TE, or WR runs. It also doesn't include option plays. Those are things for future posts.
RB Give
Isolation Plays
Gap and Pull Plays
Fold and Trap Plays
Counter Plays
Pull Replace Plays
Zone and Zone Counter Plays
Zone/Gap Combo Plays
Draw Plays
Gap and Pull Plays
Fold and Trap Plays
Counter Plays
Pull Replace Plays
Zone and Zone Counter Plays
Zone/Gap Combo Plays
Draw Plays
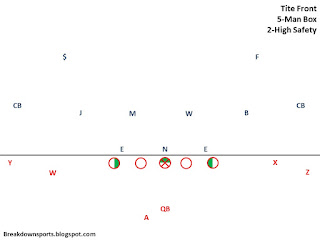
Why Run to the Short Side of the Field - Answering the question of why boundary side runs are popular
Club Call - Swapping BST and BSG Assignments

Comments
Post a Comment